When building microservices, we often need a lightweight and fast database for development and testing. H2 Database is an in-memory database that makes it super easy to run applications without worrying about external DB setup.
Here’s why H2 is widely used in microservices:
✅ Lightweight & easy to configure
✅ Runs in-memory or file mode
✅ Great for quick testing (no need to install MySQL/Postgres locally)
✅ Integrates seamlessly with Spring Boot
Steps to configure H2 in a Spring Boot Microservice:
1- Add the given below maven dependency in pom.xml
i) H2 Database dependency
<dependency>
			<groupId>com.h2database</groupId>
			<artifactId>h2</artifactId>
			<scope>runtime</scope>
		</dependency>
ii) Spring Data JPA dependency
<dependency>
			<groupId>org.springframework.boot</groupId>
			<artifactId>spring-boot-starter-data-jpa</artifactId>
		</dependency>
2- Configure application.yml or application.properties
server:
  port : 8080
spring:
  datasource:
    url: jdbc:h2:mem:testdb     # In-memory DB (deleted when app stops)
    driver-class-name: org.h2.Driver
    username: sa
    password:
  h2:
    console:
      enabled: true             # Enable H2 web console
      path: /h2-console         # URL -> http://localhost:8080/h2-console
  jpa:
    database-platform: org.hibernate.dialect.H2Dialect
    hibernate:
      ddl-auto: update          # Options: none, validate, update, create, create-drop
    show-sql: true
    properties:
      hibernate:
        format_sql: true
        use_sql_comments: true
3- Create schema.sql file in resources directory
This will automatically creates tables based on SQL scripts when application starts.
CREATE TABLE IF NOT EXISTS `customer` (
  `customer_id` int AUTO_INCREMENT  PRIMARY KEY,
  `name` varchar(100) NOT NULL,
  `email` varchar(100) NOT NULL,
  `mobile_number` varchar(20) NOT NULL,
  `created_at` date NOT NULL,
  `created_by` varchar(20) NOT NULL,
  `updated_at` date DEFAULT NULL,
    `updated_by` varchar(20) DEFAULT NULL
);

CREATE TABLE IF NOT EXISTS `accounts` (
  `customer_id` int NOT NULL,
   `account_number` int AUTO_INCREMENT  PRIMARY KEY,
  `account_type` varchar(100) NOT NULL,
  `branch_address` varchar(200) NOT NULL,
  `created_at` date NOT NULL,
   `created_by` varchar(20) NOT NULL,
   `updated_at` date DEFAULT NULL,
    `updated_by` varchar(20) DEFAULT NULL
);
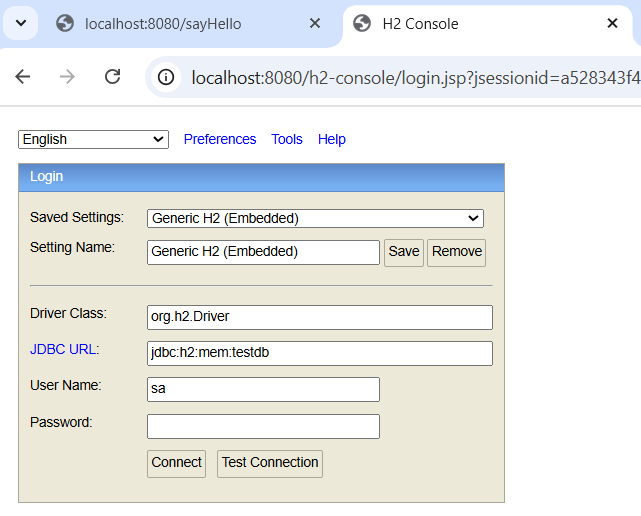
4- Start your application and open the H2 console at
http://localhost:8080/h2-console
5- Use given below connection details to connect H2 DB
That’s it! 🎉 Your microservice is now running with an H2 database.
👉 Pro tip: Use H2 only for development and testing. For production, always switch to a robust database like MySQL, PostgreSQL, or Oracle.